Title attribute; an HTML attribute which can be added to any element, but is most commonly used with the links and images. Title attribute actually allows you to provide extra information about a certain link or an image. It appears as tooltip text when the mouse moves over the link or image. Today, here at DevotePress, we will show you how to easily add title attribute in WordPress navigation menus.
Usually, web browsers display the title attribute on mouseover allowing the users to see where the provided link would take them before they even click on it.
Having said that, let’s move on to our today’s article on how you can easily add title attributes in WordPress navigation menus.
Add Title Attribute in WordPress Navigation Menus
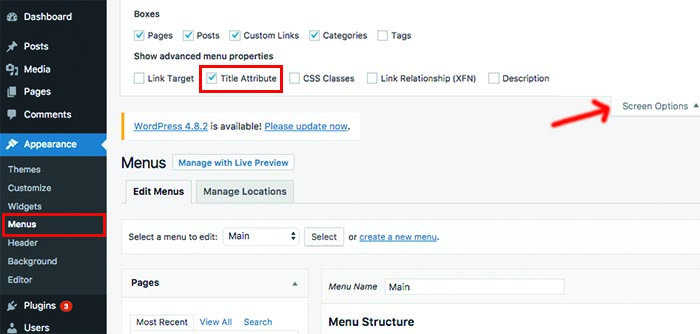
To add title attribute in WordPress Navigation Menus, you need to visit Appearance > Menus and click on the “Screen Option” tab at the top right corner of the screen.Then, in the menu that it brings down, checkmark the “Title attributes” option.
Now, simply scroll down and click on any menu item in your existing menu to add the title attributes. There’ll be a new field to it – Title Attribute. For this tutorial, we will be adding a title attribute to our Hero Content section.
After this, you will be able to easily add any title attribute text which you want as a title and repeat it for all the other navigation menus.
Remember to click on the Save menu button to store your changes. And that is it, that’s all you need to do. You can now visit your website to see the title attribute in action. It will be displayed as a tooltip on your website.
Adding title attribute in WordPress navigation menus sure is an amazing option to have. Well, now that you know how to add them, go ahead and add that extra charm on your website.


