Do you want to completely privatize your WordPress blog? This is especially for those who want to share their photographs and information only with selective people like their family and friends. So, if you’re wondering how you can completely privatize your WordPress blog, you might want to stick with this article.
First of all, let’s discuss a little about exactly when and who needs to completely privatize their WordPress blog. Well, a private blog comes in handy when you want to share your family events, wedding photographs, baby pictures and more, only with a few selective people. It can be used as your own private diary or a journal too. You can also privatize your WordPress blog if you have some team project and are willing to collaborate on a private blog. An under construction website that is not fully ready to be publicized can also be the reason for privatizing your WordPress blog as well. There can be hundreds of reasons like these that would lead you to completely privatize your WordPress blog.
So, now that you know who and when exactly do you need to completely privatize your WordPress blog, let’s move on to the tutorial.
Completely Privatize Your WordPress Blog
The first step is to install and activate the My Private Site plugin from the WordPress Plugin Repository. The plugin is very effective when it comes to allowing the Administrator to restrict a WordPress website to viewing only by the registered users. If anyone who is not registered or logged in, tries to view any page or any content, they would be provided with the WordPress login screen.
After activating the plugin, go to Settings > Private Site page for the plugin customization options.
Now, check mark the box under ‘Make Site Private’ section to completely privatize your WordPress blog.
The next step is to allow users to register on your WordPress site. If you do not want anyone to register on your website, then you can skip this part.
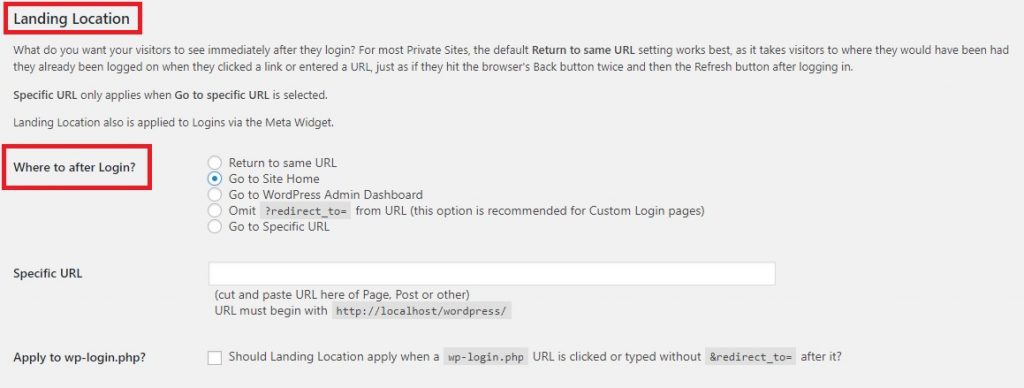
The section named “Landing Location” is where you can choose which page your users will be able to see after logging in. By default, the plugin will return them to the same URL they requested before logging on to your website. However, you can redirect them to the Homepage or whichever page you want on your website.
The next section is the ‘Custom Login section’. The page is section is only applicable if you’re using a custom login page on your website. Check the box, and provide the URL of your custom login page. Then, the plugin will use the URL you’ve provided as the login page.
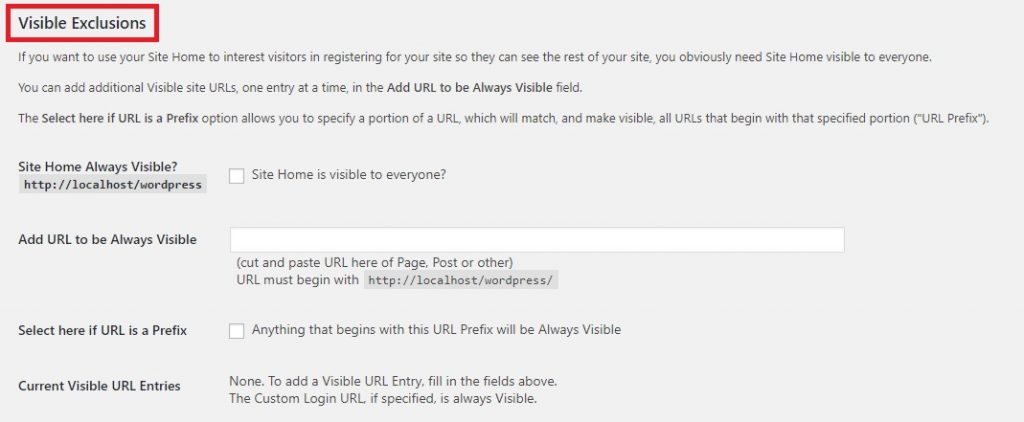
On the ‘Visible Exclusions’ section, you can choose to make your website’s Homepage always visible or add any other URL to be visible always.
Once you’re done customizing the plugin, don’t forget to click on the Save Changes button to store your changes.
And, that’s it. You’ve successfully privatized your WordPress blog completely. Now, users visiting your website will be asked to login first. They will be able to view the contents only after logging in to your WordPress blog. It depends on your settings that whether users are able to see excluded pages or will only see the login page.
We hope the tutorial helped you to completely privatize your WordPress blog. If you have any difficulties, feel free to let us know through the comments below.


