
WordPress is dominating the world-wide web currently powering more than 26% of the web. What started out as just a simple blogging platform in 2005, 16 years down the lane, it is the most popular online publishing platform. Its intuitive design and an ever-expanding list of features makes it even more flexible, and the perfect choice for a range of websites. Hence, it’s natural that its appeal will move far beyond its original borders.
Two-thirds of the WordPress users live outside the US. That’s a lot of people who probably speak English as a second language or who might not speak English at all. Unsurprisingly people would like to have WordPress in the language they use. No wonder “How To Translate a WordPress Theme” is the one of the most highly requested topics in the support forums. Overlooking other languages when developing your WordPress theme immediately turns away a whole market of WordPress users and potential clients.
In this post, I’ll be showing you how to translate a WordPress theme. It is surprisingly easy but not quick. The process is labor-intensive and will take a bit of time for you to get sorted. Have patience.
We have boiled the process in the following steps:
-
Find a theme that is ready to be translated
You’ll need to find a theme that is translation-ready. You can’t just translate any old theme. A theme needs to be localized using the GNU gettext framework. Localizing themes is a completely different process and we will be dealing with that in the coming posts.
If you want to install a free theme that is ready for translation, just go to WordPress.org and then Themes > Feature Filter. Then, on the next page tick “translation-ready” and click Find Themes. And if you’re buying a premium theme, make sure to check/ask if it’s translation ready.
-
Ways to translate a WordPress Theme:
1st Method: Translating using Poedit
Poedit is a free program which can be used to translate a WordPress theme. Here’s a step-by-step look of the process:
Firstly, install Poedit and open it. Then, go to File > New Catalog from POT file and select the POT in your theme’s languages folder.
A catalog properties will pop up asking for information what you are translating. Enter the language you want to translate here.
Simply, press OK and you’ll be asked what you want to name your translation file. Now, usually with filenames it doesn’t matter what you call it, but translation files are a lot stricter and the file name is crucial to your translation working correctly. Each language and country has a specific code you will need to use when saving translation files; for instance, if you’re going to translate a WordPress theme into Spanish you’ll name your file “es_ES.po”, whereas if you’re translating into German you’ll name the file “de_DE.po”. To break it down; the first lower-case letters define the language, whereas the second upper-case letter define the country. In many cases the language and country will be the same, hence “de_DE” for Germany, but what about languages like English or Portuguese that are spoken in several countries natively? In these cases there will be a difference in the first and second letter pairs; for the UK, the code would be “en_GB“, whereas for the USA it will be “en_US”. If you’re not familiar with the codes for your native language and country you can head over to the GNU website, where they have all the codes for Language and Country. Remember, if you use the wrong naming convention WordPress won’t be able to use your translation, so double-check if necessary.
Now you can simply start translating your theme. Poedit has a simple and straight forward interface that doesn’t involve a steep learning curve. The space at the top will display all the text ready to translate, and any completed translations will display to the right. The boxes underneath show the source text you’ve selected to translate, your translation and any notes for translators. Translating a line of text is really easy – just select a word or phrase, enter your translation and click Update.
When you’ve finishing translating, simple save your file. Poedit will automatically create both .po and .mo files in your theme’s languages folder.
Now that your theme has been translated, you can upload it to your WordPress install either using FTP or by logging into your WordPress site and uploading your theme by going to Appearance > Themes > Install Themes (after you’ve zipped your theme, of course).
- Acquire or create a POT file for your WordPress Theme
Once you’ve got your theme, open up the zip file and find the language folder. It should contain a POT file. The .pot file is basically a list of all the text lines used within files of the theme files in English language. Alternatively, if you’ve installed via FTP; just connect to your server and navigate to the /wp-content/themes/themename/languages folder. Inside you should find a language file that uses the themename.pot naming convention i.e. if you’re using the Clean Magazine theme, then the .pot file will be cleanamagazine.pot.
- Translate the POT file and upload to your Theme folder
So you’ve got the file, but unfortunately, you want to display your front-end text in a different language, you can’t just modify this core file. Instead, you need to create two new language file types; .po and .mo, as the core .pot file is used as a base from which translations are derived.
PO file (.po): The ‘portable object’ file contains the original text and the translations. It’s the file that is edited.
MO file (.mo): The ‘machine object’ file. When your translation is complete, you will convert or export your .po file to this file type so that WordPress can use it.
When you save the files, you must name them according to your language code.
Find a list of language codes at WordPress in your Language. As an example, the language code for English is “en_EN”, so you would save the translated files as “en_EN.po” first, then “en_EN.mo”. When that’s done, simply upload the files to your theme folder.
Technically you can create these files with any standard text editor (though in some cases you’ll have to change some settings to ensure the encoding is correct), but for best results we strongly recommend that you use a dedicated tool such as Poedit, an easy-to-use open-source program available for Mac OS X, Windows and UNIX/Linux that offers extensive options directly related to sorting out your .po and .mo files.
A long but simple method to translate a WordPress theme of your choice.
2nd Method: Translate Themes with the Loco Translate Plugin
This is probably the easiest way to translate a WordPress theme. First, you need to install Loco Translate plugin and then activate it. Then, simply go to Loco Translate > Manage Translations and translate the theme from your WordPress backend following the plugin instructions.
-
Setting up your Translated Theme in WordPress
Note: If you’re using WordPress 4.0 or higher (highly recommended at this point) and you chose the target language during the WordPress setup process, you will not have to perform this step.
Since English is the default language for WordPress, you will need to play with a little code to force WordPress to use your translated files.
Once translation has been finished, the first thing to do is to get your language and country code and keep it handy so you can tell WordPress which language file to use. You’ll need to make sure your wp-config.php file settings match your language files; this configuration file is located in the main directory where all your core WordPress files are located. You’ll need to open the wp-config.php file and set your language accordingly, like this:
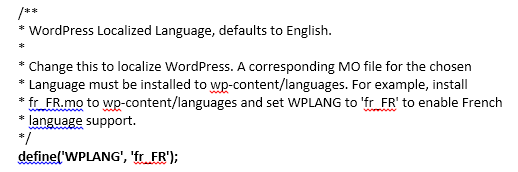
Adding this line tells WordPress you want to use translation files for French. Since you’ve translated only your theme and not your backend, your site will display in French but your WordPress admin area will continue to display in English.
By the way, your wp-config.php file is located in the main directory where all your core WordPress files are located.
The last step is to upload your created language files to the language folder of your theme using FTP. If you’re using a Spanish translation, for example, you’ll need to upload the es_ES.po and es_ES.mo files to your theme folder. Do the same with any other language files.
-
Add your translation to the WordPress.org repository
This step is very optional. In case you have already translated a theme or plugin, a lot of users would be delighted if you share your translation files with the community. As a community, we need after each other.
Translation Tips
The WordPress Codex offers some solid tips for translation that anyone translating WordPress should keep in mind:
Don’t translate literally, translate organically: Languages have different structures, rhythms, tones, and inflections. Translated text don’t need to be structured the same way as the English ones. Express things in a natural way for the target language.
Try to keep the same level of formality (or informality): Try to accomplish the equivalent in the target language, within your cultural context.
Don’t use slang or audience-specific terms: Stay away from colloquialisms and present your content in a way that users can comprehend.
Read other software’s localizations in your language: If you get stuck or need direction, try reading through the translations of other popular software to get a feel for how they have tackled their translation hurdles.
Have you translated a WordPress theme? What do you want to know about translation? Use the comments to tell us about the challenges you faced.
References:
http://www.solostream.com/translate-wordpress-theme/
https://themezee.com/docs/theme-translation/
https://make.wordpress.org/polyglots/handbook/
hello
thanks for your great article , i really trust your info , and i have one simple question , which is best for translation , Bing or Google ? thanks again for this article
I am so much excited after reading your blog. Your blog is very much innovative and much helpful for any industry as well as for person.
I have been absent for a while, but now I remember why I used to love this web site. Thank you, I will try and check back more often. How frequently you update your web site?